Instructions for using the Oculus Quest 2 headset
Accessories
| Name | Quantity | Image |
|---|---|---|
| Oculus Quest 2 headset | 1 item |
|
| Controllers | 2 items | |
| USB Type-C to USB Type-C (Oculus Link) cable, 5 metres | 1 item |
|
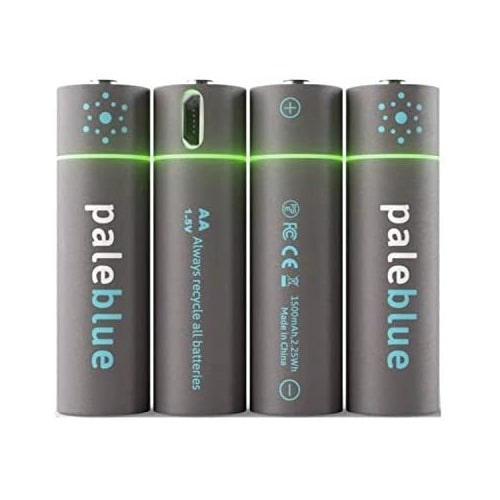
| AA - finger type batteries | 2 items |
|
| Compatible VR-Ready laptop (VR-compatible) | 1 item |
|
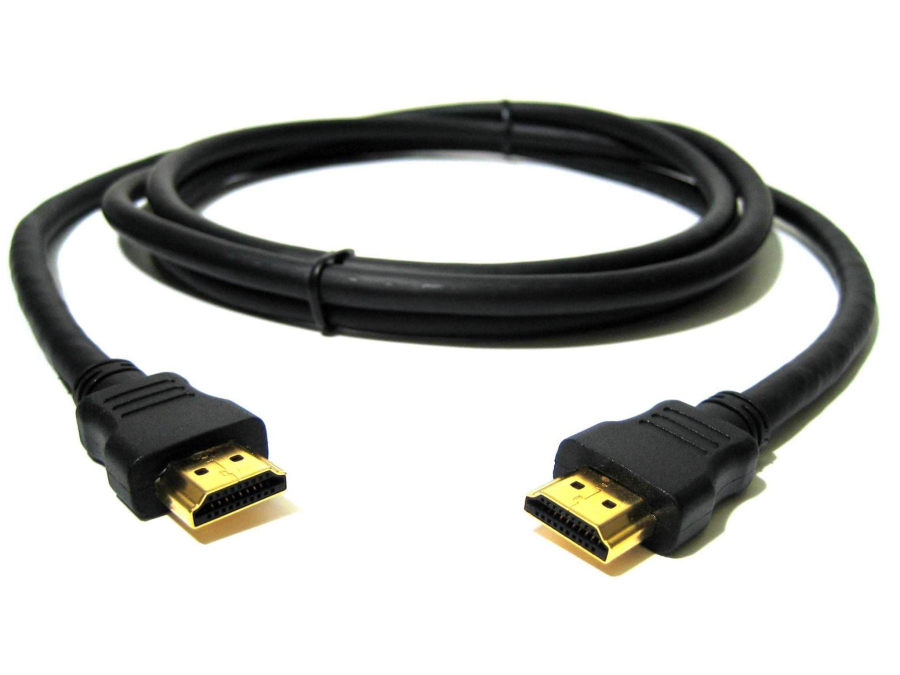
| HDMI cable to HDMI | 1 item |
|


Using VR controllers
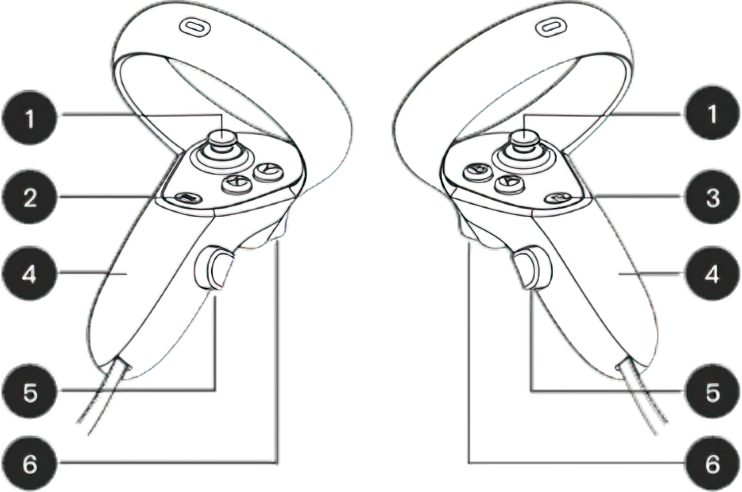
| 1 | Joystick |
| 2 | Menu button |
| 3 | Button "Oculus" |
| 4 | Removable battery cover |
| 5 | Grip button, "Use" |
| 6 | Usage button, "Trigger" |
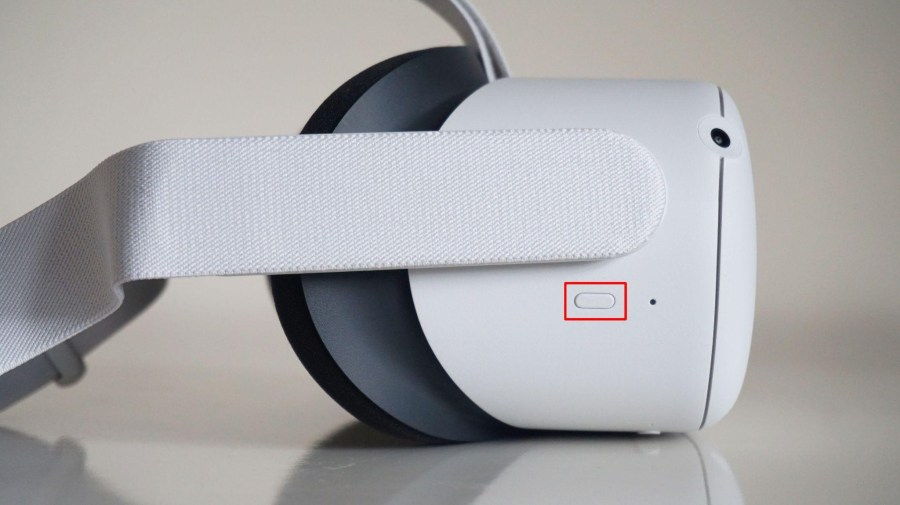
Preparing to use the headset
Switch on the headset. The power button is on the right. If the charging lamp (located near the power button) lights other than green, the headset must be charged. The charging slot (USB Type-C) is located on the left side of the helmet. As soon as the light turns green, you can start setting up the helmet.

If you connect the helmet to your computer via a cable, the indicator light will turn white.
- Remove the shipping films from the lenses. A microfibre eyeglass cloth is suitable for wiping.
- The plastic sheets that cover the batteries must be removed from the controllers.
Registration
Facebook account
To use Oculus Quest 2 you will need a Facebook account. If you already have an account, you can use it to log in. If you don't, you'll need to register it:
- Go to the Facebook registration page;
Fill in the fields according to your real details.

- In the mobile phone/email address field, it is highly recommended that you enter your phone number to make it easier to interact with your Oculus account in the future.
- In the age field you must enter your date of birth so that you are currently over 18 years of age.
After entering the required personal data, press Register;
A window will open to confirm the verification code, which will be sent to the phone number you have specified. Enter it and press Next;
A pop-up window will appear informing you to confirm your account. You will be further logged in with the selected phone number. Press OK.
Oculus account
You must also have an account on the Oculus platform to continue. To do so:
- Go to the Oculus website and log in with the Facebook account you just created by clicking Log in via Facebook;
- You will be redirected to Facebook, where Oculus will request access to your data. Click Continue. The Oculus website will open with your Facebook name. Click Continue as a new Oculus user;
- The website will then ask you to create a username (nickname) to replace your first and last name. Once you have decided on a nickname, press Continue;
- The next step is to create a pin code. Memorise it, you will need it for future work;
After confirming the pin code, you will need to enter your email.
You may not get this step if your Facebook account is already linked to your email.- After entering your email, click Send email. To continue, go to your email and in the email from Oculus confirm your registration by clicking on Click here to confirm your email address.
- Once clicked, you will be taken to a new browser tab on the Oculus website, which will tell you that the email address has been confirmed and you can proceed to sign in. Click the appropriate button and enter the Oculus account login details you provided earlier.
Registering an organisation
To use the Varwin platform, in some cases you will need to download the Varwin mobile client to the headset. To do this, you will need to enable developer mode. Oculus policy only provides this feature for organisational owners, so you will need to register it now, even if you plan to use the helmet for personal use.
- Go to the Oculus for developers website and check the status of your developer account;
You must have a verified phone number, which is one of the conditions for being a developer with Oculus.

 The phone number is only used to confirm that you are a real person. It will not be used for any type of mailing or advertising.
Go to the organisation's registration website. In the single field, enter the desired name of the organisation in English, e.g. MyOrganisation. Below on the same page, check the box that you are confirming the creation of the organisation. Click Submit.
An established organisation is a prerequisite.- The "Developer's non-disclosure agreement" window will pop up. Tick the I Agree box and click Submit;
- You can close the browser tab.
Steam account
If you plan to use the headset using Oculus Link mode, you will need a Steam account. Registration takes place on the Steam website:
- Enter the required email, confirm it again in the next field, select your country of residence, tick the box to confirm that you are human and tick the box to confirm that you are over 13 years old, if so. Click Continue. Do not close the tab.
- An email confirmation pending window will open. Go to your inbox, find the email from Steam, open it and click the appropriate button.

- After confirmation, a new tab will open notifying you that the confirmation was successful. Open the previous tab and continue with your registration.
- Enter your Steam account name and password. Click Finish. Registration is complete, the Steam home page will open.
- At the top of the page, find the Install Steam button and click.

- The platform download page will open. Click Download and open the downloaded installation file. If a window appears requesting the application's permission to make changes to the device, click Yes.
- The Steam installation wizard opens. Click Next.
- Select the required platform language, press Next.
- Specify the installation path of the platform by pressing the Browse button. You can leave the default installation path unchanged by clicking Install. The installation will start. Wait until it is finished, keeping an eye on the green progress bar.
- When the app is installed, tick Start Steam and press Done. Wait until it has checked for updates and, if there are any, wait until they have been installed.
- The Steam login window opens. Enter the username and password you used when you registered on Steam and click Sign in
- If the login details are correct, the main Steam screen will open.
- As shown in the screenshot, open the library, enter SteamVR in the search box, select SteamVR in the search results and click install

- An installation window will open where you will see all the necessary installation information. Click Next. The download process of the tool will start. You can monitor the download status by the download bar at the bottom of the Steam window or by the download percentage next to the SteamVR name.
- Once SteamVR has loaded, you can consider this step completed.
First run
Install and pair the Oculus mobile app with the headset
In order to work with the headset, you will need to pair the headset with your mobile device:
- Connect your phone to Wi-Fi and activate Bluetooth on your phone.
- Download the Oculus mobile app on your Android or iOS phone and log in any way you like using your Facebook or Oculus login details.
Follow the prompts and go through a brief fill-in of information, indicating username, choice of avatar, etc.
If the app prompts you to merge your Oculus and Facebook accounts, press Confirm- Click on the Devices tab at the bottom of the screen and link to the new Oculus Quest 2 headset.
The app will prompt you to use Messenger Oculus, press Next.
- Wait for the app to detect your headset.
- Put the phone away and pick up the headset.
- Before continuing, find a place where you can sit with your arms moving freely. Sit down and put on your headset.
- When the headset is switched on, you will see a grey box with a five-digit code at the top of the screen. Remove the helmet and open the Oculus app on your mobile phone. Enter the five-digit code in the app.
- Wait until the pairing is established.
Enabling developer mode
- Go to the devices tab and select the newly paired headset.
- From the list of headset settings, select Developer mode.

- The Developer Setup screen opens. Switch Developer Mode to On (blue) using the slider on the right.
- Done!
Headset set-up
- Put the helmet on and continue with the set-up.
- Hold both controllers in your hand and with one of them, use the trigger to press the five-digit code. The "→" button will appear, press.
- Squeeze the trigger and swipe down to find the desired language. Once found, press it with the trigger and press "→".
- Check for clarity. Adjust the position of the headset on the face so that the image on the screen is clear and press Continue.
- If necessary, adjust the distance between the lenses. If the screen image is blurred, remove the headset and move the lens to the right or left until the image is clear. Press Continue.
- Do not stand up while adjusting. Before continuing, find a place where you can sit with your hands free to move. Press Continue.
- You will now need to connect to the Wi-Fi network. Select your network from the list and press the trigger. A window will open for you to enter your password. Make sure that the data entered is correct and press Connect. If the details are correct, your network name will be shown as Connected. Click Finish.
- See the introduction to the headset and the rules of use, which are available on the Oculus website for more information.
- Read the safety message and click Confirm.
- The headset will reboot to make the changes you made.
- After the restart the latest system updates will automatically be installed and the headset will go to the next step.
- Set the boundary of the guard system. the guard system is a safety feature that helps you stay in the game zone. the virtual boundary you have created will appear in VR to warn you when you approach it. Press Continue.
- Confirm the distance to the floor. Look at the virtual grid. If it is at floor level, tap Continue. Otherwise, tap Reset. Lower the net and lightly touch the floor with the controller before confirming the setting.
Determine the playing area. Point the controller at the floor and then press and hold the trigger to draw the boundary of the free play area.
A playing area of at least 2 x 2 metres is recommended for games with movement.
If you plan to use the headset without moving, tap Change to the boundary for games without moving.
- If the headset detects objects in a marked play area, a warning will appear to inform you that it is unsafe to be inside that play area. If you think the marked area is safe, press continue. To redraw the area, tap Redraw.
- If the marked play area is smaller than the recommended size, the headset will warn you that it is unsafe to be inside this play area. If you think that the marked area is safe, tap continue. To redraw the zone, tap Redraw Draw Zone.
- Confirm the boundary of the playing area. Look around and check that the boundary is correctly set and that there are no obstacles within it, including objects that can be hit by outstretched arms. These settings can be used for all games in a sitting or standing position without moving. You will see the boundary of the play area if you get too close to it during a VR game. Press Continue.
Training will prompt you to try using the Reset centre function. Do as the prompt in the headset says.
- The device is set up. To view your Home environment and access the universal menu, press the Oculus button. With this button you can exit apps and return to the universal menu at any time. Press the Oculus button. Press Continue.
- Once setup is complete, you can take a short tutorial on the menu navigation in the Oculus headset, but you can skip it if you already have experience using the headset. Click Continue to go through the tutorial and Skip the tutorial to skip it.
Connecting a headset to a PC
- Go to the Oculus website and click Download Software for Quest 2 to download the Oculus software for PC.

- Open the downloaded file to continue the installation.
- Select the required language and press the Start button.
- Read the terms and conditions and click Accept.
- A window will appear with information on the directory where the software will be installed. Click Install Now. The download and installation process will start, the time will depend on your internet speed.
- When the installation process completes, click Next.
- A Login to Account window will appear. Click Continue with Facebook.
- A notification will appear informing you to continue the login process in your browser, where your Facebook page will automatically open. Confirm login by pressing Continue as /username/. A dialogue box will open, check the box as shown in the screenshot below and click Open OculusClient.exe.

- Clicking Open OculusClient.exe will open the Oculus application on your PC
- Login has been made. Select a profile image from the ones below and click Next or click Skip.
- You will then be prompted to change your privacy settings, press Confirm.
- You will also be prompted to add a payment method, tap Skip.
- Select Settings on the left, press More, then General, in the window that appears switch the first item Unknown sources to Active by clicking on the slider on the right. Allow unknown sources by clicking Allow.
- The software setup is now complete. Now you need to connect the headset. Go to the Devices tab and click Add headset.

- Select Quest 2 from the list of suggestions and press Continue.
- Select connection mode.
Selecting connection mode
Quest Link feature
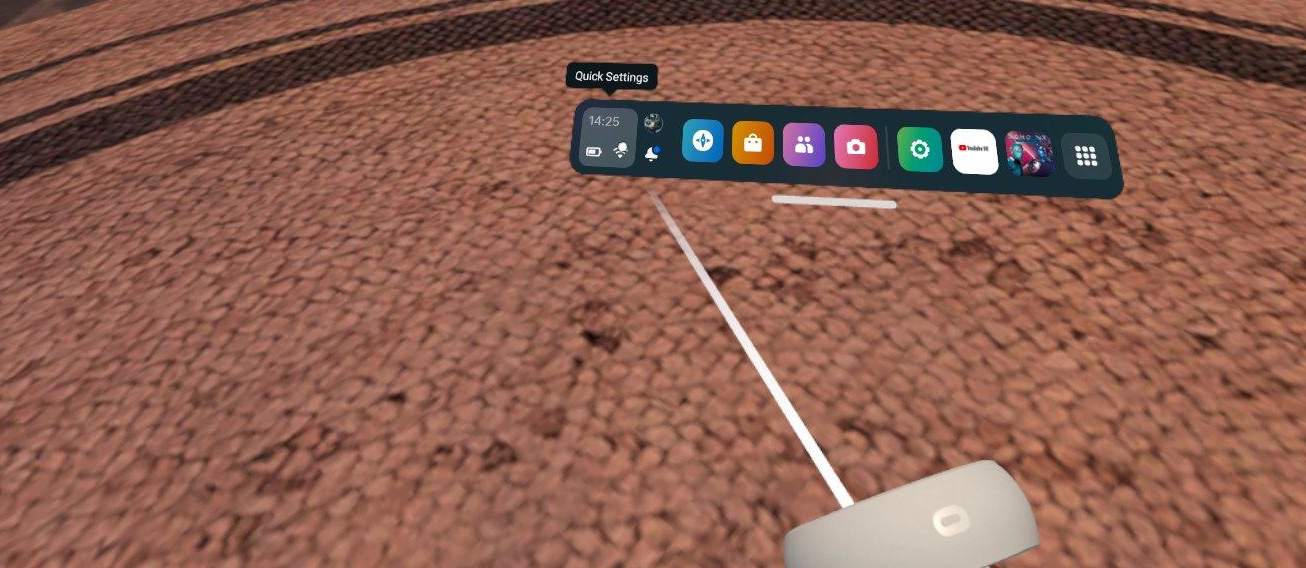
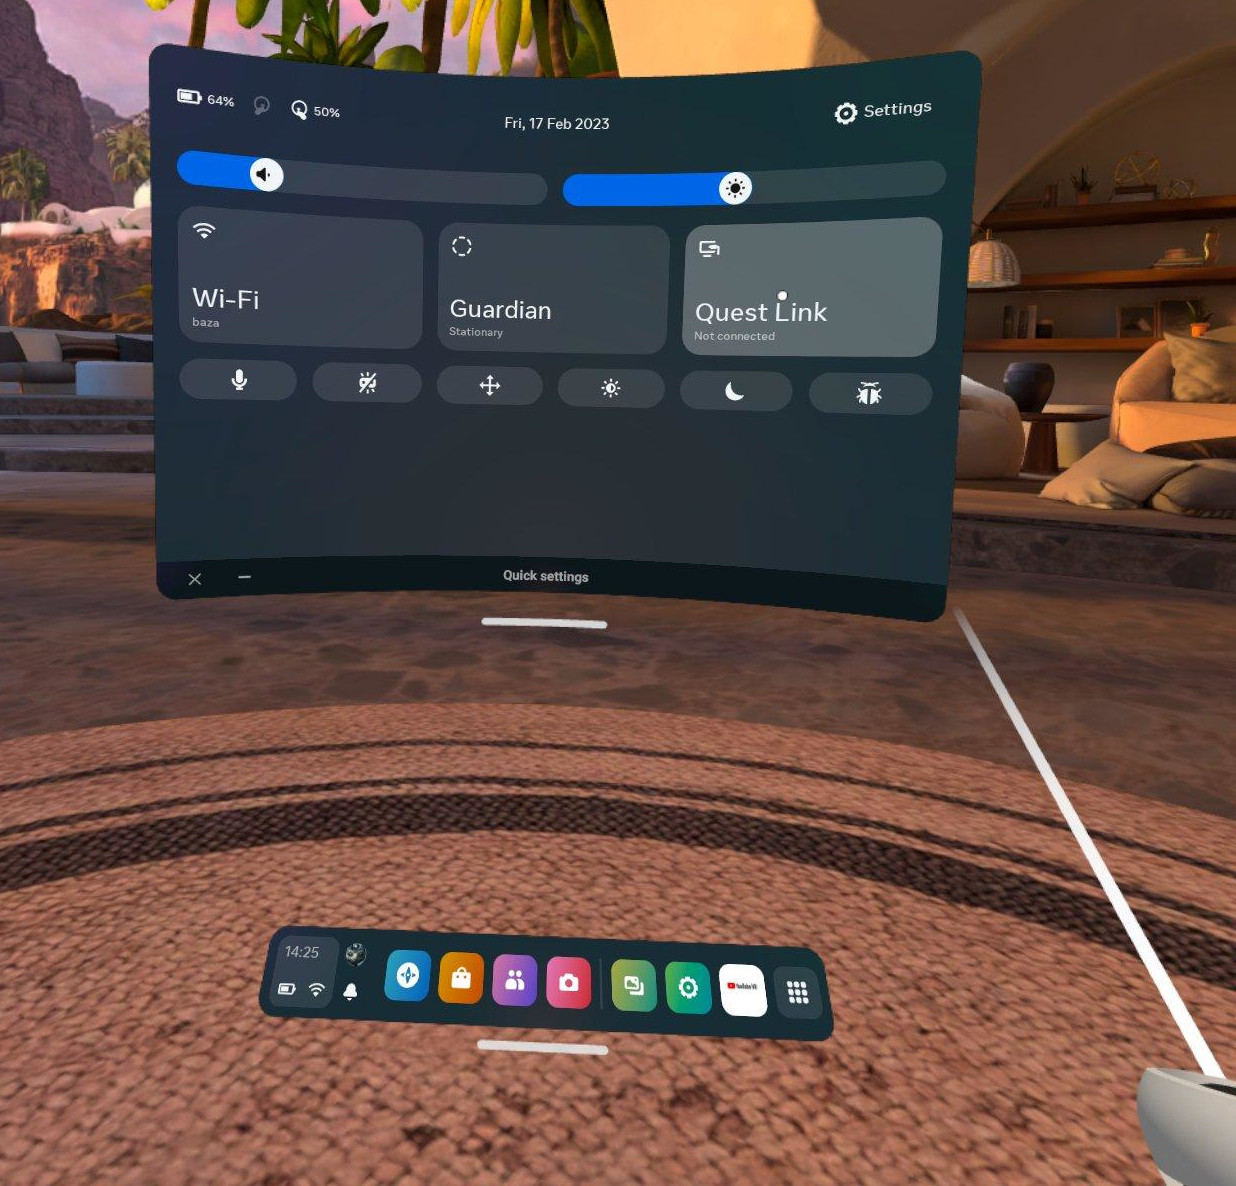
In order to use the ability to run VR projects from a PC, it is necessary to enable this function in the Quest settings. To do this, open the Quick settings menu (the leftmost button with time, battery level and Wi-Fi), in the screen that appears go to Settings (the gear icon in the upper right corner of the window), in the list of settings select the Quest Link tab and in the appeared section enable the Quest Link function by clicking the switch (the switch will be highlighted in blue when it is "enabled").
In the Devices tab of the Oculus desktop app you can track the status of your headset.
Connection via cable (Link)
- From the VR headset's home screen, go to the Quick settings menu;
- Click on Quest Link;
- The window that appears will show a valid wired connection to the PC;
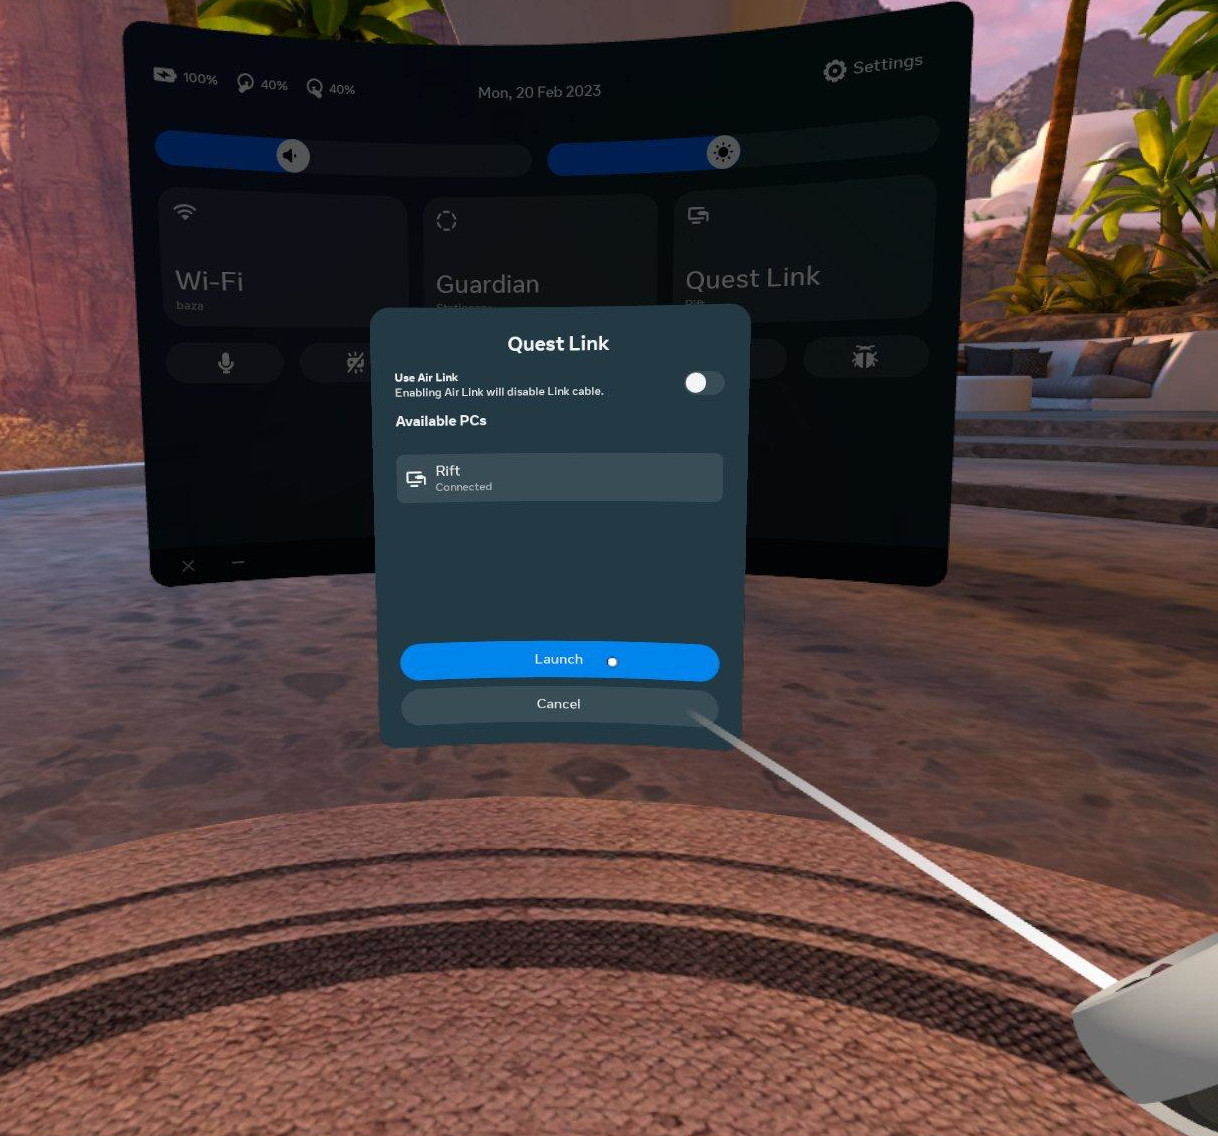
- Press the Launch button to activate this mode.
- Switching to this mode will change the visualisation of the starting environment to an infinite grey space.
Connection via Wi-Fi (AirLink)
- From the VR headset's home screen, go to the Quick settings menu;
- Click on Quest Link;
- Move the Use Air Link switch to the On position (the switch will be illuminated blue);
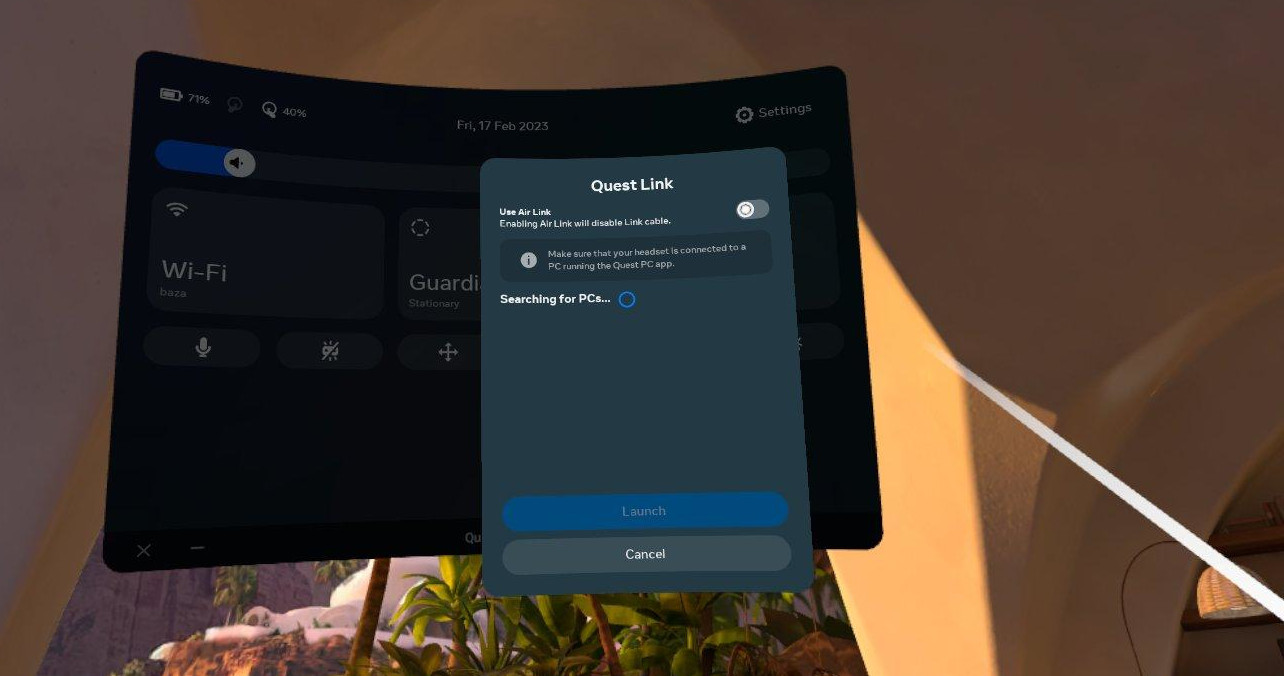
The description that appears will show a PC connected to the same network as the VR headset and on which the Oculus application has been logged in with the same data as on the VR headset;
The number of PCs displayed may be more than one if there are PCs with access to the same network and the same authorised Oculus account nearby
- Select an available PC and click on the active Pair button;
- You will be prompted to confirm the code to bind;
- To confirm the code, open the Oculus app on your PC and, after making sure the code matches, press Confirm;
- Go back to the VR headset and press Continue;
In the Quest Link window, check the PC connection status and click Launch.
Reliable Air Link requires a good Wi-Fi router with a stable intranet connection. Oculus recommends using a 5 GHz network running on AC or AX routers.
Running a Varwin project
Starting a project with a cable (Link)
- Switch on the headset.
- Switch on the Oculus App on the PC.
- Ensure that Oculus Link mode is switched on in the Headset Settings.
- Connect the headset to the PC with the Link cable and put it on.
- The device will ask whether to allow the application you are running to access files on the device. Click Allow.
Go to Quick Settings and enable Oculus Link. Click Launch
Wait until the main Oculus Link menu opens.
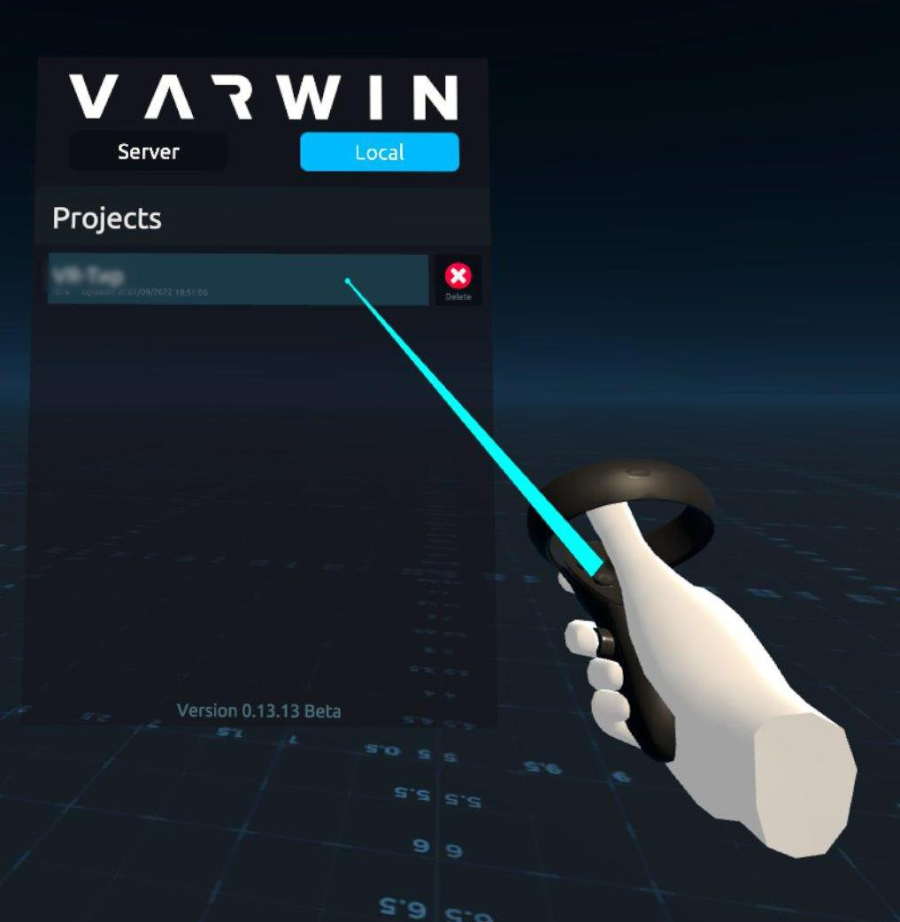
- Remove the headset, start Varwin on the PC and go to the projects tab. Click on the name of your project. A list of available scenes in your project will appear on the screen. Click on View in VR and put on your helmet.

Running the project in mobile mode via Wi-Fi (AirLink)
- Turn the headset on and put it on.
- Ensure that Oculus Link mode is switched on in the Headset Settings.
- Go to Quick Settings and activate Oculus Air Link mode.
- In the window that opens, select the paired PC and click Start.
- Remove your headset, open the Steam platform on your PC and start SteamVR.
- Open Varwin on your PC and go to the projects tab. Click on the name of your project. A list of available scenes in your project will appear on the screen. Click on View in VR and put on your headset.
- The project will start to load.
Launching the project in mobile mode
To work with Varwin in mobile mode, you need to install the SideQuest APK file downloader on your PC, which will install the Varwin platform directly on your headset.
SideQuest installation
- Connect the headset to your PC using the Link cable (Type-C to Type-C or Type-C to Type-A).
- Go to the SideQuest download page and download the software to your computer by selecting Windows download. Wait for the file to download.
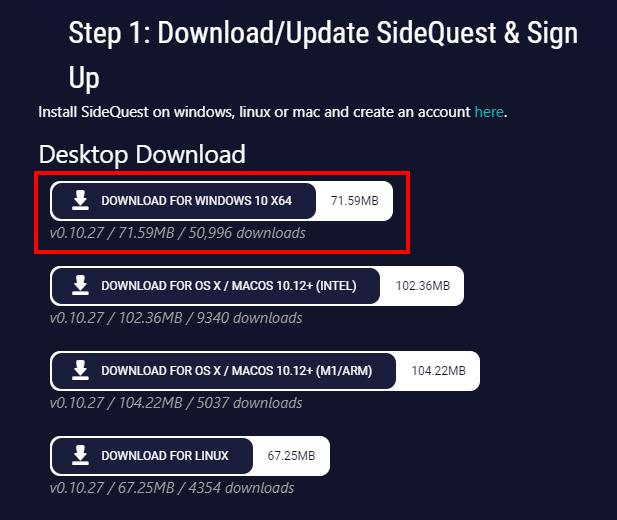
- Open the downloaded SideQuest-Setup-x64-win.exe file. This will open the installation window.
- Select the installation option for Me Only (User name), press Next.
- The installer then prompts you to select the installation path for the software. Click Install.
- Wait for the installation to complete and tick Run SideQuest when finished. Click Finish.
- The SideQuest window will be opened.

- In the top left corner you may notice an orange indicator light. It means that SideQuest has detected a connected headset but does not have access to it.
- Put the headset on. You will see a message telling you to allow data access to this PC. Tap Always allow for this PC.
- A message will then be displayed to allow access to the data. Press Allow. Remove the headset.
- A green light will now illuminate in the SideQuest window (top left), indicating that the headset is detected and ready to transfer files.
Downloading APK files
- Download the Varwin mobile client. Follow the link, select the required Varwin version and click on the appropriate link in the table for downloading APK client.
- Press the Install APK file from folder on computer button in the SideQuest top menu in the form of a white box with a down arrow.

- A window will open showing the path to the file. Open the folder where you downloaded the mobile client. Highlight the file and press Open.

- Wait until the installation is complete. This will be indicated by a message at the bottom of the SideQuest window, a green bar will appear with the text All tasks completed!
- All operations to be performed on the cable are completed and the helmet can be disconnected from the PC.
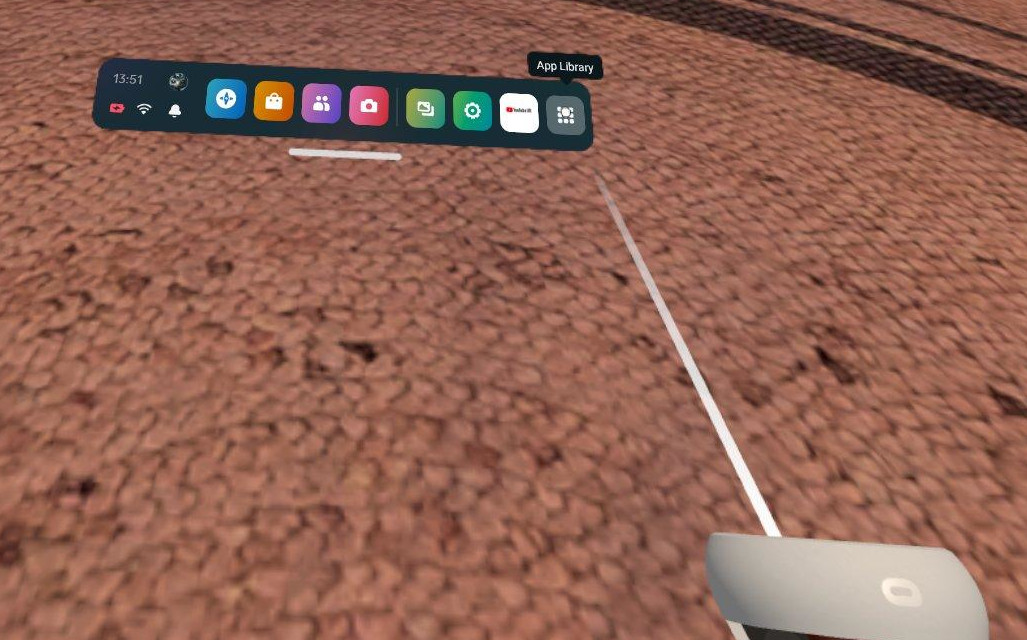
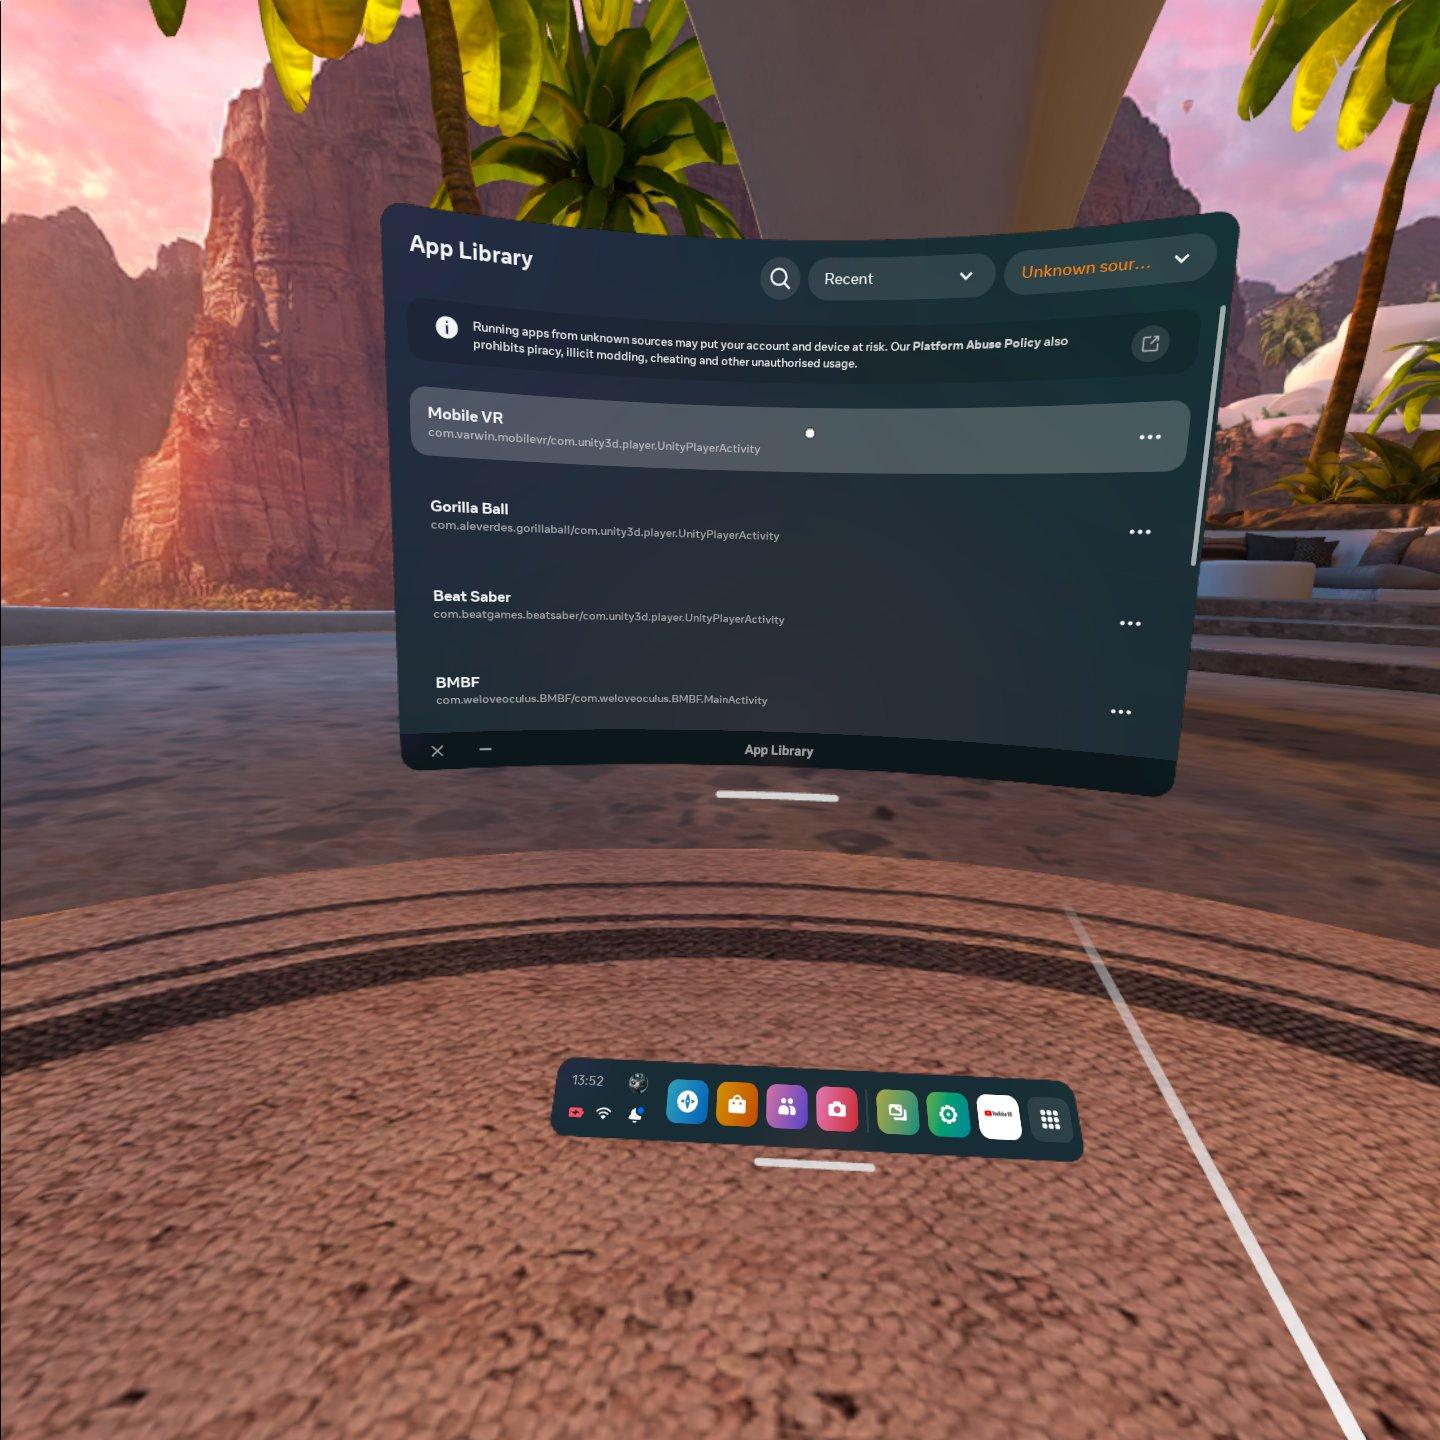
- Put the helmet on and go to App library (right-hand button with three dots).
- In the menu that opens, click on All and select Unknown sources.
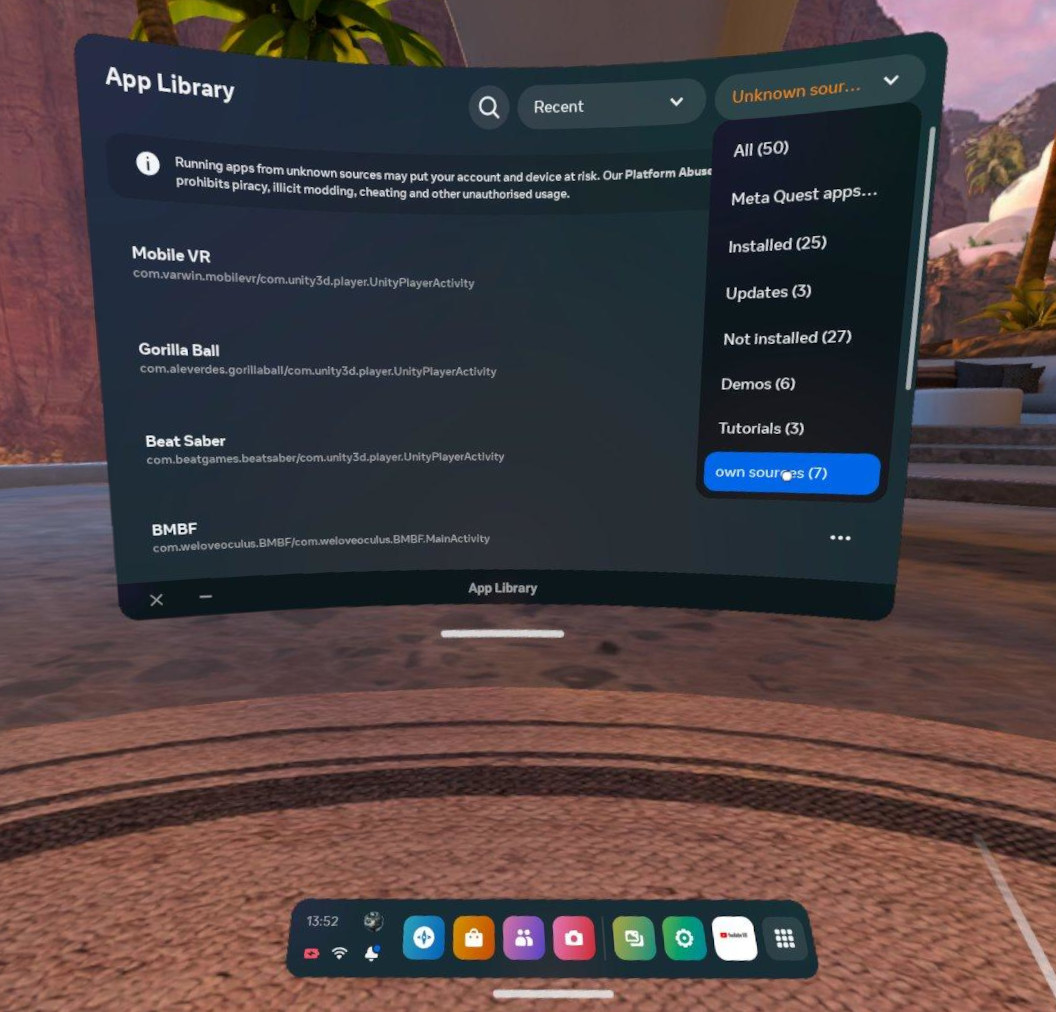
- A window will open with a list of the Varwin platform you have previously installed. To launch, click on Mobile VR
- The device will ask whether to allow the application you are running to access files on the device. Click Allow.
- Varwin will start up. The device will additionally ask permission to record audio. Click Allow.
- Great, the platform is installed!
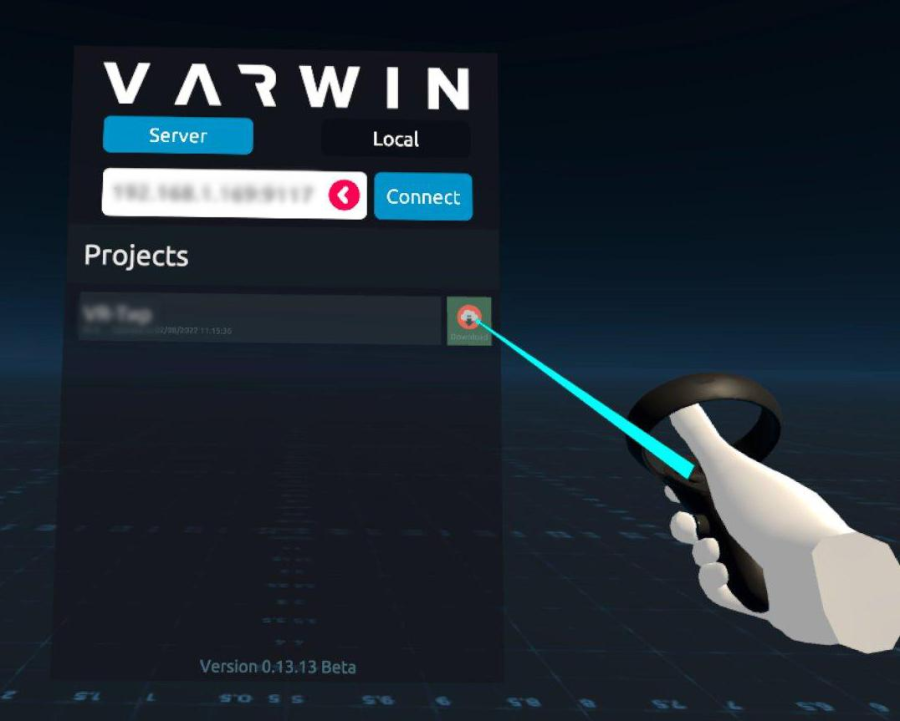
Starting a project by IP address
The mobile platform allows you to connect to your project library on a PC via IP address entry. The PC and headset need to be connected to the same Wi-Fi network for operation.
- Remove the headset, start the Varwin platform on your PC and go to the Projects tab. Click on the project name and then click View in mobile VR.

- A modal window opens with a selection of different mobile headsets. Select Oculus Quest from the list. You will need the third item - the server IP address.
- Put on your headset, start the Varwin platform and enter your IP address and press Connect.
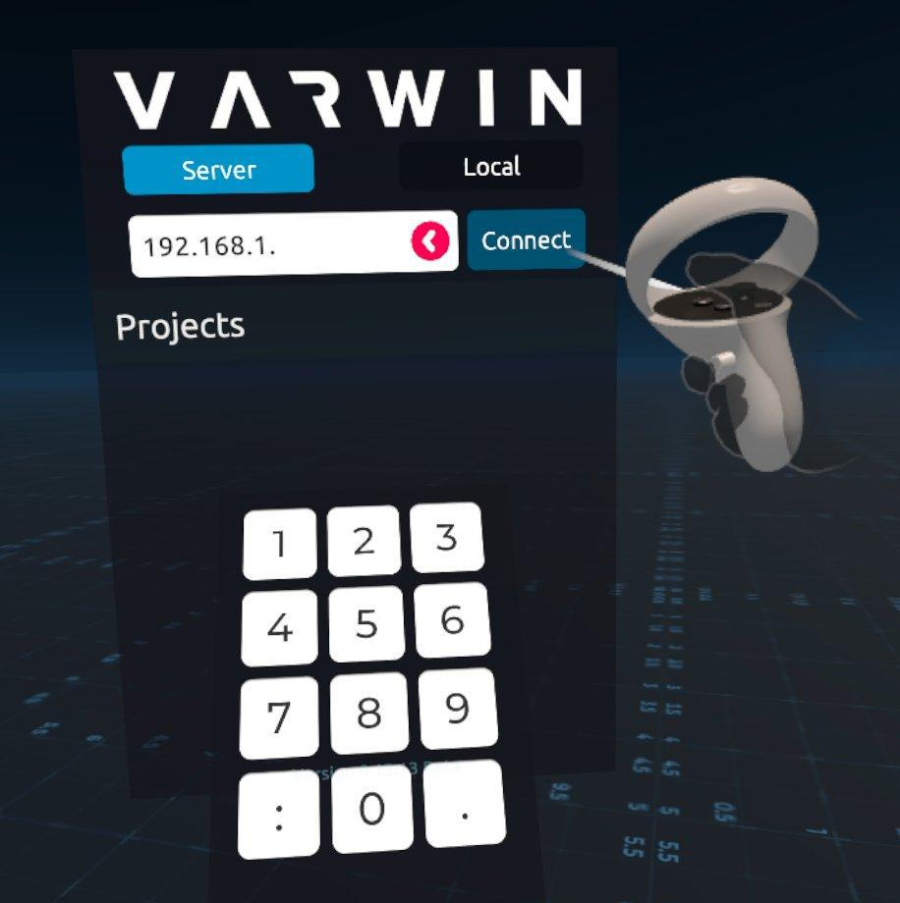
- If the IP address is entered correctly, a list of projects will be displayed.
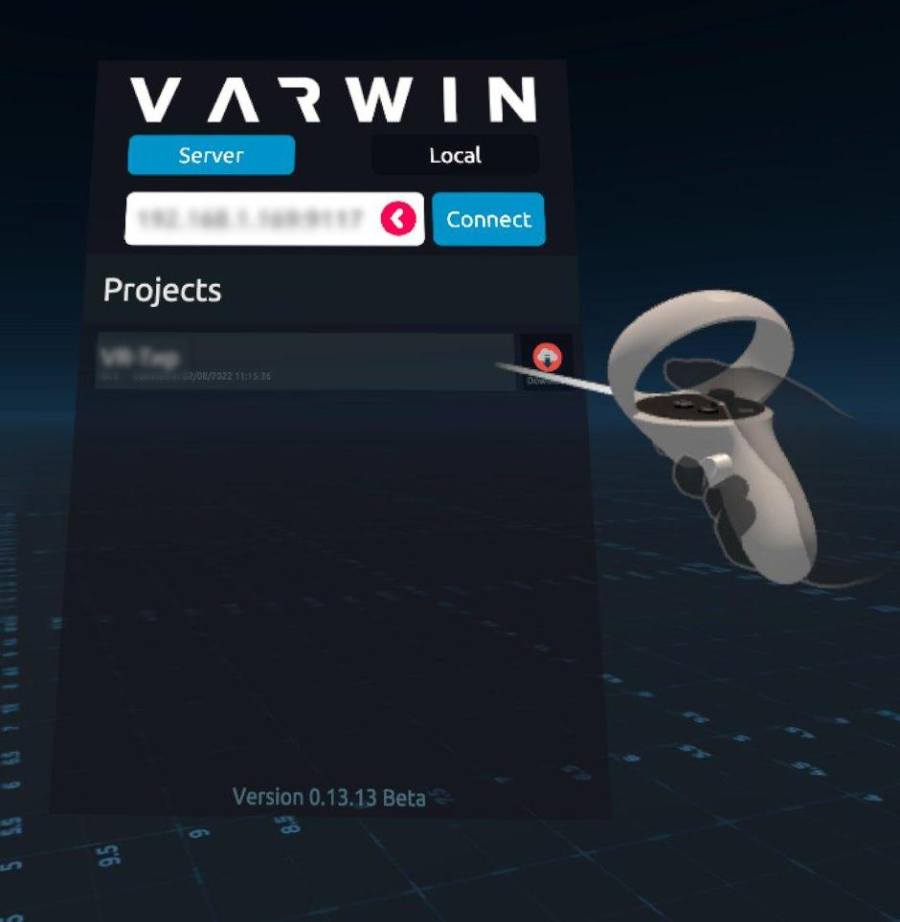
- Click on the project to start it.
- What to do if you have selected the wrong case or completed a case. There is a button on the right hand controller to exit the Oculus menu, pressing it will take you to the Oculus main menu where you can restart the Varwin platform and select the project again.
Downloading projects to the headset
If you want to use the project offline, i.e. when the internet is not available, you can save it for local use.
- To do this, enter the IP address of the project, and in front of the project, on the right-hand side of the window, click on the download icon.
- Wait until the downloading process is complete. The download time may depend on your internet speed.
- Once the download is complete, open the Local tab. In the drop-down list of saved projects, select the desired project to run. Click on this project, it will be downloaded and you can start the case.